Whether you want an in-ground or above-ground swimming pool, you must install a liner. The good news is that by following instructions, any DIY enthusiast can do it.
The efficiency and precision of this DIY project depend on your choice of spray adhesive and how you use it. The goal of this post is to walk you through the entire process and help you make the best use of the spray adhesive you choose for the project.
Understanding Pool Liner Installation
There are three types of pools: concrete, fiberglass, and vinyl. If you install a liner, you have two options: vinyl and fiberglass, both of which have advantages and drawbacks.
Vinyl liners are smooth and provide great comfort. They are available in many designs, and they are customizable. However, these liners are not very durable; they last only 5-7 years. The installation also takes slightly longer than fiberglass liners.
In contrast, fiberglass liners are remarkably durable, in part because salt does not corrode them. They come with custom features such as benches, steps, and sun decks, requiring very little maintenance.
With that said, fiberglass liners are pretty expensive. And in terms of their shapes, the options are rather limited.
What Are Pressure-sensitive Spray Adhesives?
Pressure-sensitive spray adhesive forms a bond at room temperature when pressure is applied. This adhesive works without the use of any additional heat, water, or solvent. It is used in products such as sticky note pads, stickers, glue dots, labels, pressure-sensitive tapes, automobile trim, and swimming pool liners.
Here are the key characteristics of pressure-sensitive spray adhesives:
The strength of this adhesive is correlated to the pressure applied. That means it gains strength as you apply pressure.
This aggressive glue offers permanent bonding, as opposed to some other types of spray adhesives that offer temporary bonding.
No heat, water, or any other solvent is needed to activate pressure-sensitive spray adhesives.
Once something has been attached to a smooth surface using pressure-sensitive spray adhesive, you can remove that from the surface without leaving a residue. This is because this adhesive is very elastic and offers cohesive bonding.
Why are pressure-sensitive spray adhesives used for pool liner installation?
If you are going to install a pool liner, a pressure-sensitive spray adhesive can make the process a lot easier for you. This adhesive can also make the installation more efficient. Here are the reasons why both professionals and DIY enthusiasts are using pressure-sensitive spray adhesives:
Strong Bonding
The technology behind spray adhesives has come a long way over the last decade. Now pressure-sensitive spray adhesives are as strong as, if not stronger than, pressure-sensitive contact adhesives. This superior bonding strength makes spray adhesives a great option for installing pool liners that must be secured strongly in place.
Easy to Use
Contact adhesives can get messy, and that’s the main reason why most DIY enthusiasts tend to avoid them. Spray adhesives have a great appeal due to their ease of application. Even if you have no experience, you can conveniently hold a canister and uniformly apply this adhesive over large surface areas. You can also easily reach intricate areas, such as tight corners.
Quick Installation
For professional pool liner installers, reduced downtime is important. Spray adhesives dry very quickly and thus make the installation process quick. It can drastically reduce labor costs and save you valuable time. Thus, you can get the job done in the shortest possible time.
Durability
Some spray adhesives, such as Sprayidea 96, have gained immense popularity for their superior bonding strength and durability. They withstand the harsh effects of pool chemicals, UV rays, and other environmental conditions. These spray adhesives are incredibly temperature-resistant (-30℃to 65℃), and offer bonding for years.
How to Install a Pool Liner Using Pressure-sensitive Spray Adhesive?
Installing a pool liner is easier than you might think. If you are a DIY enthusiast, keep reading this step-by-step guide to installing a vinyl liner in your swimming pool. Here are the steps you need to follow:
Step 1: Measure the pool liner
To make sure your pool liner is the correct size, you have to measure it. The pool liner you are using should contain instructions for measuring it. The goal of this step is to make sure the liner correctly fits the pool.
There are various colors and patterns to choose from. So, choose the one that fits your surroundings. If you want to naturally heat the pool with the rays of the sun, consider choosing a darker color. You can discuss it with your provider.
Step 2: Gather the tools and supplies
It would help if you had the following tools and supplies to install a new pool liner:
- Submersible pump
- Mop and shop vacuum
- Utility knife
- Screwdriver
- Duct tape
- Broom
- Pressure-sensitive spray adhesive
- Wall foam
- Garden hose
- Faceplates and gaskets
Step 3: Drain the pool
Use a submersible pump to drain your pool. Be careful when discharging the water. Choose an area that will not cause any damage to your property. If there are specific rules about draining pools in your locality, be sure to follow the rules. Make sure every bit of water is discharged from the pool. Use a towel or mop if needed.
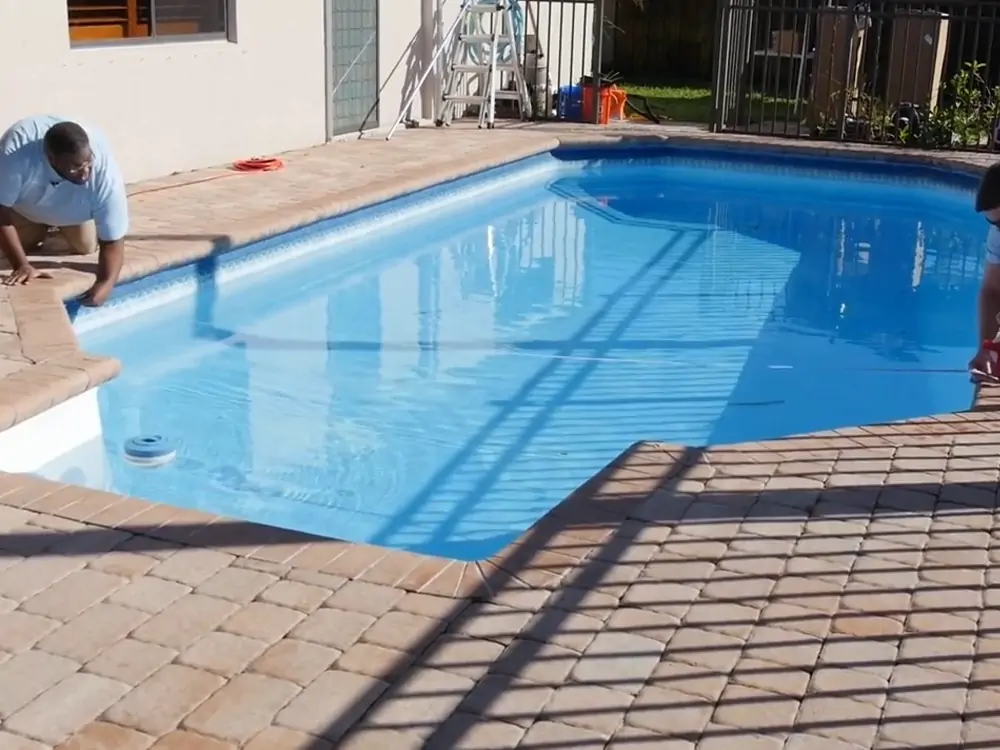
Step 4: Remove the old liner
Remove the gaskets and faceplates from the main drain, skimmer, pool steps, return fittings, and lights. Then use a utility knife to cut out the liner and remove it. To make the process easier, consider removing the liner in parts.

Step 5: Prepare the floor and walls
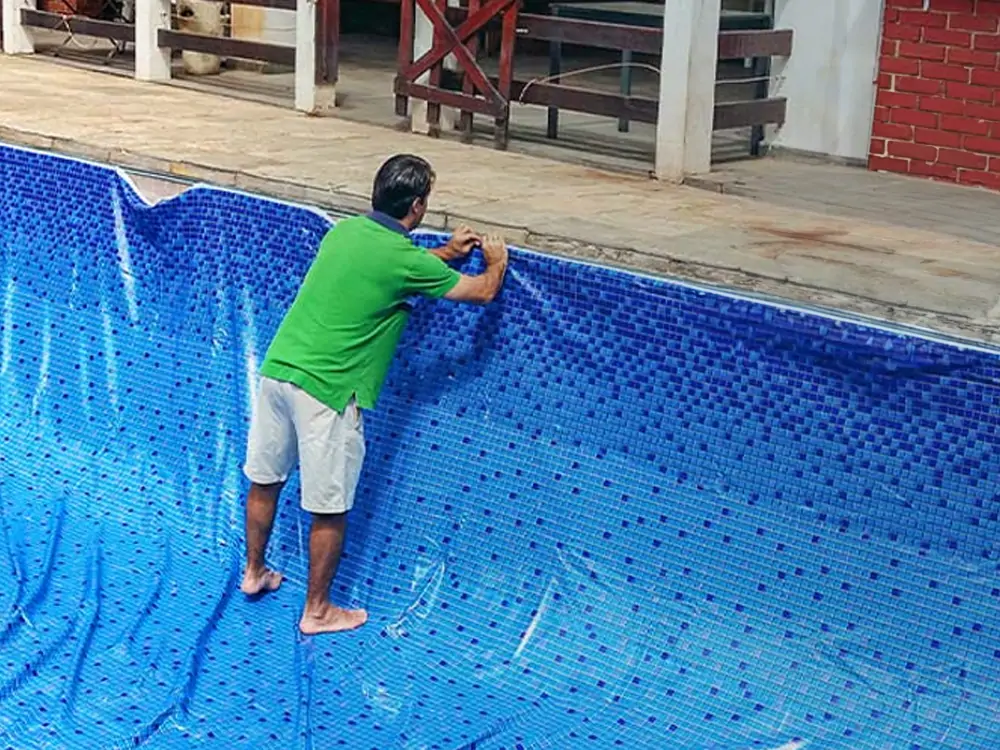
Before you install a liner, the pool should be clean. If there are rough spots, cracks, or damages in the pool walls, repair them. If needed, scrub the walls with a broom. Once the walls are clean, start attaching foam. Apply the pressure-sensitive spray adhesive on the wall and the foam, and attach them. The bottom of your pool should be dry.
Step 6: Install your new pool liner
As you open the box, try your best to avoid puncturing the pool liner. It should include instructions for positioning it in your pool. Hang it in the track, and as you insert the beads, pay attention to the corners first.
Use a vacuum to reduce wrinkles and tighten up the liner. For this, insert the vacuum hose in the mid-section of the liner. To prevent air loss, tape up the hose. Then turn up your vac. This is a smart way to tighten up the liner. And once it is tight, smoothen out the wrinkles by hand.
Step 7: Fill the pool
Use a garden hose to fill the pool with water. When there is about a foot of water in the shallow end, remove the vac. Then install the new faceplate and gasket. Remember, the durability of the pool liner depends on the maintenance of the pool.
Wrapping Up
It is not enough to make your swimming pool just usable and functional; it should be aesthetically pleasant as well. You can do that by attaching foam pads to the walls with pressure-sensitive spray adhesive.
Apart from the technical aspects of installing pool liners, be careful about other things, such as finding a good location, assembling the frame, and preparing the site. We hope that by keeping all the tools and materials ready at hand, you can get the job done in a few hours, even if you have never installed a pool liner.