Hey man, are you going through a sagging headliner of your car? You may find it costly to fix in a car repair shop. Don’t worry. This is a minor problem, and you can fix it yourself. Now, let’s see what kind of condition your headliner is in. And how to fix the headliner with adhesive spray.
Sags from the Edge
If your headliner’s edges are slightly cocked, you can use a special glue for the headliner. Spray along the opening area, wait for 3 to 5 minutes, and finally, stick on.
Sags in the Middle
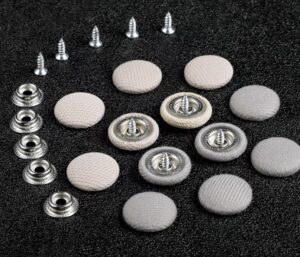
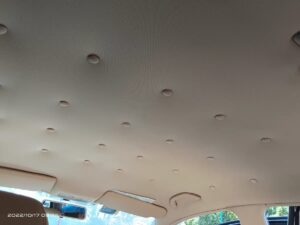
A bit of a severe situation is that the headliner caved in the middle. If you don’t want to remove the headliner, there is an easy way to fix it. You can use car roof repair clips to repair it. There are also some precautions when using it.
- You can use it when a single layer of headliner falls off.
- When choosing, compare the colors and choose a similar color
- When installing, the distance between the button and the button should be about 10cm.
The only fly in the ointment is that the actual effect may not be so beautiful.
Sags in Massive
Extensive shedding has affected regular use. At this stage, you will already need to remove the headliner and replace the new shed. Next, I will tell you how to fix the sagging headliner.
How To Choose Headliner Spray Adhesive?
The best headliner spray adhesive choice must be 3M Headliner & Fabric Adhesive. A bottle costs about $20. If it is unavailable in your area, you can choose another car upholstery glue for your car.
-
- Make sure the glue you buy is car-specific for better stickiness and a more prolonged lasting effect. Other adhesives may cause the carport fabric to become weak and peel off.
- Choose aerosol spray glue so that the spray is more uniform.
- Choose an adjustable nozzle for the nozzle so that it can adapt to various awkward corners, and there will not be sticking in some places and no sticking in some areas.
How To Remove Your Car Headliner?
Removing your car headliner is an actual do-it-yourself job. First, you must remove safety handles, visors, lights, and trim to remove the entire headliner, cardboard, or fibreboard. When removing these, be careful with the places that connect with the wires so that the interior lights will still work when you install them back. You can watch the video below if you need to learn how to uninstall it.
How Do You Spray Adhesive On A Headliner?
Preparation before using spray glue
Before using the spray glue for the headliner, you need to wire brush all loose foam from the board and clean the carport surface. Ensure the carport surface is under condition and free of oil, dust, and water. Shake the spray adhesive for the car headliner well before use, and spray the glue evenly at 20-30 cm from the bonding surface.
Things to note during spraying
When gluing the carport fabric, it is recommended to spray both the back of the fabric and the carport. First, spray evenly on the back of the fabric, then spray horizontally and vertically on the carport. The corners and the places with radians must be sprayed in place.
After spraying
After spraying, check if there is any place where the glue is agglomerated. If there is any, you can use a small card to spread it evenly. Doing this prevents the glue from penetrating the front of the fabric. Of course, if the fabric you use is the fabric with soundproof cotton or leather, you don’t have to worry about the problem of glue penetration.
Check
In practice, we can spray a piece of fabric and a part of the carport, then cover the material. (Each section is about 40-50cm) Do not spray glue on the entire carport, then paste the cloth. The fabric must be stretched along the surface where there is curvature. And if there are folds on the edge, you need to straighten them out.
Cover with the cloth and wait for the glue to dry naturally. After 2 hours, you can check whether there is degumming. If there is degumming, you must press it again with enough pressure. If not, you can put the headliner back in the car.
After completing the above steps, you will find that you can easily replace or repair the headliner with only an adhesive spray. With a few hours of effort, you can make your car roof look new and keep it suitable for years.
Using Headliner Spray Adhesive Tips
- The temperature is high in summer, so exposing the car to the sun for 3-4 days after installation is not advisable. In winter, the temperature is low, and the moisture of the glue evaporates slowly. If it doesn’t stick and bubbles, you need to press every half hour again until it sticks.
- Spraying glue on both sides that requires pasting can make them stick more firmly.
- If you spray glue on the entire carport, you may not paste the things entirely within an adequate time. It will dry the glue, significantly reducing its effect.
- To be safe, you can wait 24 hours for the glue to fully cure before installing the headliner.
- After each use, you must invert and spray the product for 3s to clean the nozzle automatically. This way, the next time you use it, you can use it directly without worrying about not being able to spray it out.