Noise and echo are invisible problems in our living spaces. Many of us struggle to balance noise and peace in our daily lives. Be it in the bedroom, office, or studio, reverberation and echos are akin to spider webs. You constantly try to remove them, but somehow they reemerge. When sound hits walls and other hard surfaces, it bounces off and disrupts the room’s ambiance. These noisy disturbances interfere with clear communication and concentration. They also take the pleasure out of watching and listening to movies and music.
Luckily, we are fortunate to be in the 21st century. Technology is a vital aspect of our lives and a solution to many concerns. And of course, this includes unwelcomed audio feedback. In this case, Acoustic Panels are the innovation we need to tackle echos in our surroundings. They absorb or block sound waves that hit hard surfaces and thus help to enhance your listening experience.
In this article, you’ll learn everything you need to know about acoustic panels. Here, you will discover how to install acoustic panels with spray adhesive. You will also discover the types of acoustic panels, and where you can install them. We aim to provide you with the necessary knowledge on “How to install acoustic panels” to solve your acoustic hindrances. Read on for more.
What are Acoustic Panels?
Acoustic panels are brilliant innovations that remove unwanted sounds in your living areas. They are usually made from materials that sound waves can penetrate. Such materials include foam, fiberglass, and special fabrics.
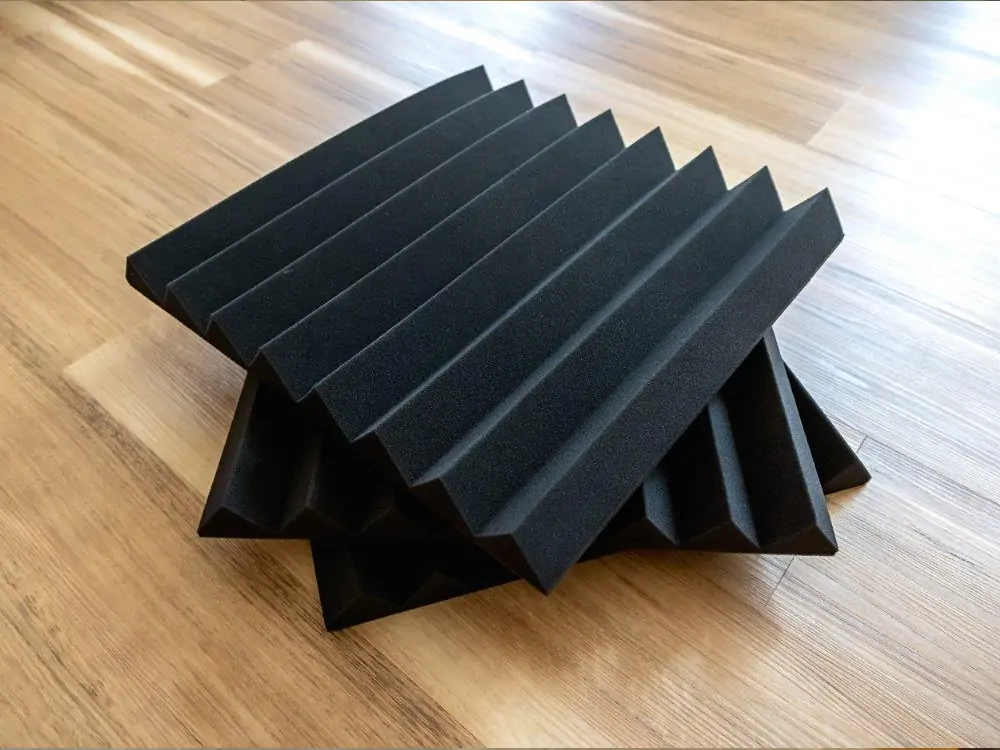
Types of Acoustic Panels
Sound panels come in many shapes and sizes but are grouped into two main categories; absorbers and diffusers.
The most striking feature of diffusers is their interesting designs. They have non-flat surfaces that feature different patterns such as ridges and curves. Their distinct shapes allow them to scatter sound waves in all directions. You can picture how this works as the ripples that form when a pebble hits the surface of a calm lake. The outward movement of these ripples is similar to how diffusers disperse sound. These panels reduce the echoes in your rooms and enhance sound clarity. Diffusers help reduce echoes in your rooms to improve sound quality.
Unlike diffusers, absorbers function like sponges. They absorb sound waves instead of deflecting them like diffusers. Similar to how sponges absorb water. When sound hits an absorber panel, it will convert the sound to heat energy. This process is why the absorber panel can effectively lower the noise in a room. They help create a peaceful ambiance with little transmission of sound between rooms. Thus, absorbers are suitable for many spaces, including classrooms and bedrooms.

Absorbers and diffusers are great options individually. But together in a room, they create the best acoustic environment. If you place diffusers on your walls and ceilings, they will scatter the sound waves throughout the room. This will stop echoes from forming and keep reflected sound away from your ears. But what happens afterward? The deflected sound, although muffled, will still travel around the room. This means that even though you stop the echoing, the overall noise level remains the same. This is why you might need absorbers in the room as well. They complement diffusers by absorbing the scattered sound to create a quieter environment. So, if you want a room remotely close to soundproof, consider installing both absorbers and diffusers.
Places to Install Acoustic Panels
Acoustic panels are vital tools that help you enhance the sound quality of your spaces. While it is important to know how to install acoustic panels, it is also crucial to know where to place them.
1. Identify your Reflection Points:
Before you install your panels, you need to experiment to find specific points in your room. These points are called reflection points and are caused by the tweeters in your speakers. Reflection points are the places where sounds bounce from your hard surfaces. They are the reason you have echoes and distorted audio.
To find these reflection points, you require two things: a mirror and a trusty assistant to aid you. Ask your assistant to sit in your usual listening position as they face the speakers.
After that, position yourself against a side wall and adjust the mirror until your assistant can see the tweeters in the center. That will be your reflection point. After finding this spot, mark the area with painter’s tape for later. Then restart this process on the opposite wall until you find the second reflection point. After completing this step, you should have two points on both sides of your listening area. That is where your first acoustic panels should go, so we recommend using diffuser panels.
2. The Walls and Corners:
When sound reflects, it bounces off all four walls. So, if you want to improve your sound quality, place diffuser panels on the front and back wall. To clarify, the front wall refers to the area behind your speakers while the back wall is the area opposite your listening area. As a complementary measure, you can place absorbers in the corners of your room.

3. Ceilings:
If you have a large room with high ceilings, installing acoustic panels on the ceilings will benefit you a lot. It is a common practice to install ceiling cloud panels above your TV and sitting area for the best effect. Alternatively, if your ceiling has a grid system, install sound-absorbing tiles that are specific to your grid.
How to Install Acoustic Panels with Spray Adhesive
The long wait is over, and it is time to learn how to install acoustic panels. So without further ado, here are the steps:
1. Get your Supplies:
To start with, you need your acoustic panels, spray adhesive, and safety equipment.
When selecting your acoustic panels, there are a few things to consider. These factors include the thickness, design, material, and noise reduction coefficient (NRC) of the acoustic panels.
- NRC — aim for acoustic panels with 0.6 NRC and above
- Thickness — choose panels that complement the size of your room and meet your noise reduction needs
- Material and design — choose a panel with a visual appeal that suits your preferences.
- For spray adhesives, check the can and ensure it is solvent-based and has a low VOC. These kinds of adhesives create powerful bonds and don’t release as much fumes during use.
If you want to know more about the glues that can be used for foam bonding, you can check out this category: Foam Spray Adhesive
For bonding acoustic panels we recommend: ACOUSTIC MATERIAL SPRAY ADHESIVE 93
2. Preparation Stage:
Before you proceed, ensure that your walls are clean. Clean surfaces promote stronger adhesion to the panels. You only require a wet cloth and detergent.
After removing the dust and grime from your walls, leave them to dry.
While it dries, you can begin planning your layout. You may use a pencil to sketch the plan of your panel placement. You can use paper for your sketch or draw directly on the wall. Always remember to be mindful of the areas with the most sound reflection.
After sketching your layout, inspect your acoustic panels. Some of these panels are large, so they are difficult to wield. Therefore, if necessary, you can use a utility knife to trim the panels to your preferred size.

3. Applying the Adhesive:
The next step is to apply the adhesive. But before that, make sure your room is well-ventilated. Always ensure that your doors and windows remain open to allow the adhesive fumes to disperse.
Afterward, lay down some drop cloths, plastic sheets, or newspaper. These will protect your furniture and workspace from overspray.
Next, take your adhesive and shake for at least 30 seconds. It ensures that the ingredients in the spray adhesive mix thoroughly. After doing this, hold the can a few inches from the panel. A 12 to 18-inch distance is ideal. Once in position, spray the adhesive in a sweeping motion. As you do so, ensure there is even coverage on the surface.
If you want to learn more about how to use spray adhesive, you can read this article: Spray Adhesive: Everything You Need To Know.
4. Installing the Panels:
After applying the adhesive on the wall or panel, be patient and let the adhesive turn tacky to the touch. It should have a slightly sticky feel after a wait time of 30 to 60 seconds. Nevertheless, always refer to the instructions on your can for the specific wait time.
Once the glue turns tacky, align your panels with your markings. Double-check your alignment and ensure the panels are straight in all directions.
Once in position, press the panels against the surface for nothing below 30 seconds. Make sure the pressure is firm and even to create a strong bond.
For larger panels, use a rolling pin to apply steady pressure. If the workload is too much for you, it is best to recruit an assistant.
5. Check your Work:
After completing the above steps, you are down to the last part, inspecting your work.
Check your newly installed panels for any errors. Make sure they are aligned and remain straight after removing the pressure. Now is the only time you have for last-minute adjustments. It is easier to fix minor misalignments before the adhesive cures than after the glue dries.
As a post-installation tip, leave your adhesive to dry for a day or two. You must refrain from touching or placing anything on them. Or else you will ruin your hard work to attain a peaceful space.