Basting a quilt is an essential part of quilting. While there are multiple ways to baste a quilt, spray basting is considered the most convenient way to get the job done. This method involves using spray adhesive to adhere the quilt layers.
In this post, we are going to provide a step-by-step guide to baste a quilt. Hopefully, you will find this guide useful and learn how to baste a quilt. Keep reading!
What is quilt basting?
A quilt has three layers: the top, the backing, and the batting. The process of quilting involves securing these layers. Spray basting and pin basting are two ways to do it.
In spray basting, you use spray adhesive to secure the quilt layers. There are spray adhesives particularly intended for this work. You will find several brands of quilting adhesive spray on the market. With spray basting, Fabric does not move or shift too much while quilting.
Comparison of spray bonding and pinning:
You do not need to leave extra batting and backing around your quilt. And the process is remarkably faster than pin basting. However, your finished quilt may contain some glue on it, and unlike pins, spray glue can not be reused.
In contrast, pin basting involves using quilt basting pins to secure the layers. These pins resemble safety pins but they come with a curved side that makes it convenient to hook the pins through the layers of the quilt.
While pin basting requires a lot of pins, one good thing about this approach is that you can re-use the pins as many times as you want. But there’s a problem: pin basting is a messy process that involves slippage with your fabric. Your quilt top starts pushing, which can be a nuisance.
If this is the first time you are going to baste a quilt, you are likely to hate the tedious part of securing all the pins.
If you prefer pin basting, it’s a good idea to secure the pins about 5 to 6 inches apart. Choose relatively small pins measuring an inch or less. It’s good to start in the center and then work your way out. As you go, you have to smooth your quilt out. There will be pins all over. So, as you quilt, you will have to remove the pins.
Most people prefer spray basting because pin basting is a rather messy process. Spray basting is also faster—the entire process takes fewer than 30 minutes. With that said, spray basting must be done in a well-ventilated area.
Things you will need
Before you start basting your quilt, make sure you have the following supplies:
- Quilting spray adhesive
- Scissors
- Curved safety pins
As we have stated, there are several brands of quilting adhesive sprays on the market. If you are not careful when choosing a product, it is possible that the product will complicate the process rather than simplifying it.
Sprayidea DY-100 is one of the most widely used quilting spray adhesives. This adhesive is primarily intended for quilt basting. However, it is used in other applications such as handicraft, sewing, computer embroidery, and applique.
Sprayidea 81 is another temporary spray adhesive that is great for quilt basting. It is a repositionable spray glue that has other applications. One particular use is the embroidery of underwear, baby clothes, toys and white fabrics.
A step-by-step guide to basting a quilt using spray adhesive
Down below is a step-by-step guide to basting your quilt.
Step 1: Be sure to get the batting wrinkle-free
Most likely your batting has come in a package, and therefore has wrinkles. Now take some time to get those wrinkles out. A straightforward way to do it is to put the batting in the dryer. Leave it there for about 20 minutes and then heat press batting together by using your iron if you want. However, using the iron may not be a good idea if you are using polyester or wool.
Step 2: Tape the backing to the floor
Get your backing ready while the batting is in the dryer, getting rid of the wrinkles. Iron the quilt backing if it has wrinkles. The process of basting requires adhering the quilt backing to the floors.
You can use painter’s tape or masking tape for that. It is important to figure out which side of batting goes up. Make sure the right side faces the floors while the other side faces up. You will find the process easier if you tape all the corners first. The backing should be flat, but make sure it is not stretched out.
We recommend that you tape the backing to an empty hard floor. But if there’s not an empty floor in your home, you can alternatively hang the backing on the wall. Sandwiching a quilt is something that can be done outside as well.
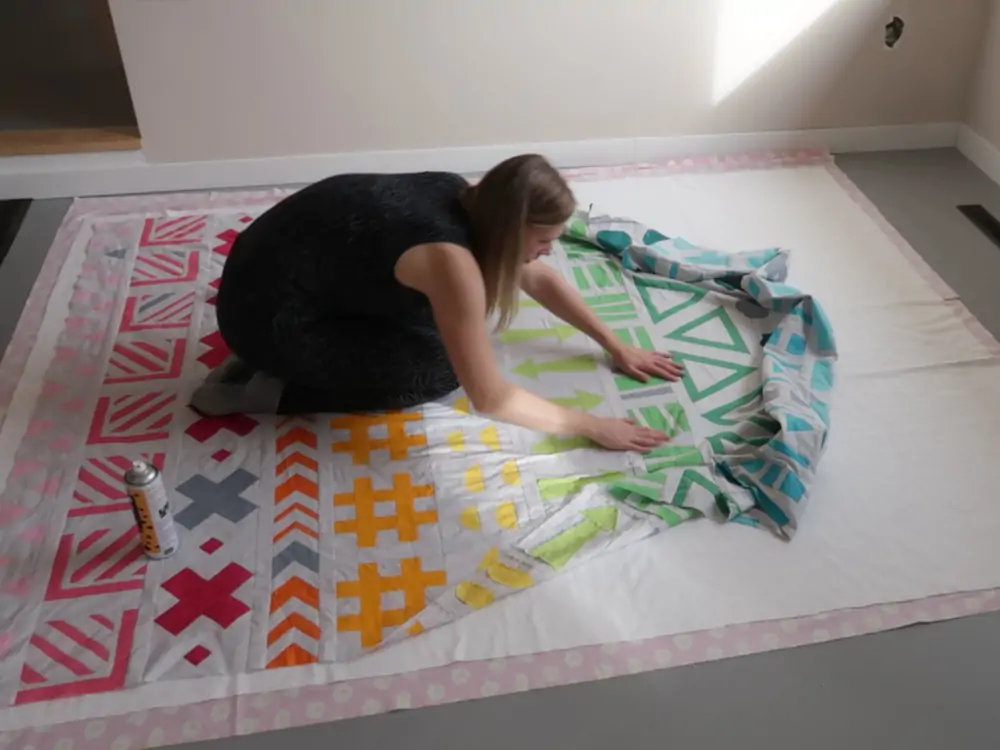
Step 3: Lay them on the quilt backing
Take the quilt batting out of the dryer and align it to the backing. Smooth out the batting and the quilt top. Once you have laid out the quilt top, use fabric shears to trim off the extra batting. You can later use those scraps for other projects.
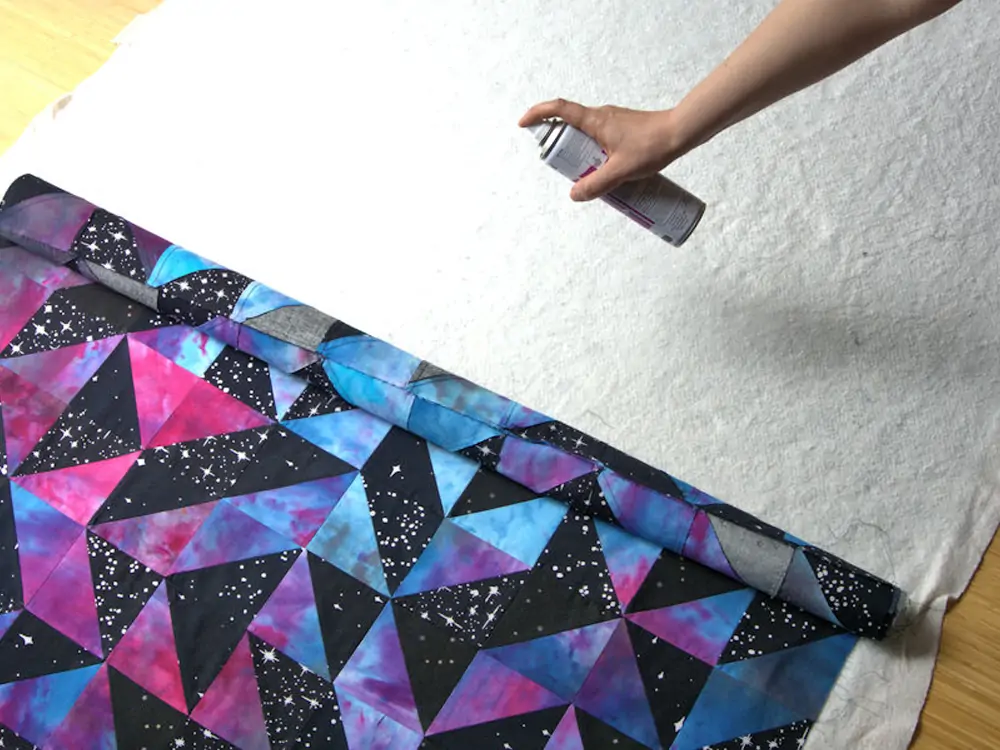
Step 4: Spray the two layers together
Once you have assembled the quilt sandwich, spray the batting to the backing. Roll the quilt top and batting roughly about half way and then spray some adhesive on the down side of your quilt backing. Do not apply basting adhesive spray on too large a section at a time.
Unroll the batting and stick the backing and the batting together. Keep doing it until the entire piece has been adhered to the fabric. Then smoothen it out and secure the corners nicely.
Step 5: For extra security, consider adding pins
You can skip this step if you want, but some curved safety pins can really hold the quilt layers strongly together. When adding the pins, pay attention to the corners and the edges. Once you have added the pins, you will rest assured that the pieces are secure!
Additional tips
Consider following the tips below to make your project a success:
- Once you have applied the quilting spray adhesive, it is a good idea to start quilting right away. Well, you can leave it for some time, but not more than a couple of days. And when the quilt is glue basted, do not handle it too much. If you want to move it to another place, do so while keeping it flat. Do not roll it or fold it up.
- If your quilt contains glue on it, you can wash it out.
- Learn how to spray adhesive. In case of overspray, consider using drop cloths so that you do not have to remove dry glue from the floors. Yes, removing dry glue can be a rather messy process.
- Some quilters report that spray glue gunks up their needles while others do not. This issue is usually caused by the application of too much spray baste. In general, even if there is a build up on your needle, it should not affect the quilting process.
- As you spray, watch over the edges and avoid overspray.
- Choose your quilt batting carefully, because there are so many options to choose from. You cannot go wrong with any of the two products mentioned in this post.
Conclusion
Now that you have basted the quilt sandwich, you can start quilting on a sewing machine. Spray basting is the fastest way to do it, and hopefully you will find the process pretty straightforward.
As with everything, you will get better at it with time and experience. We encourage you to experiment with different basting options and figure out what works best for you.