
Your house is your home only when it reflects your personality. Adding a personal touch to your space is not limited to simply adding more furniture. You can also do it by mounting photos and artwork on the walls.
When it comes to hanging photos on concrete walls, the most common method is to use a hammer and nail. This method, however, has a drawback. It often involves patching and repainting the wall.
The good news is, there are several great ways to hang pictures without nails. In this guide, I will show you how to hang pictures on the wall without ever needing to pick up a hammer.
Things to Consider Before You Start
Before you get started, consider two important factors: 1. The surface of the wall, and 2. The weight of the item. Get these two things right, and your installation will be successful and durable.
The Wall and the Weight

Your wall may be made of plaster, drywall, brick, or wood panelling. Whatever the material is, it should determine your approach. Additionally, consider the item’s weight.
If the item weighs less than 2 lbs, use simple adhesive steps or mounting putty. For medium-sized canvases, photos, and lightweight mirrors, you may consider using peel-and-stick products. Heavy-duty items weighing over 10 lbs need a more secure installation. In such a case, the project may require a specialized mounting tape.
Protecting Your Art
Be careful when using adhesive for photos. Choose an adhesive that won’t damage your prints, pictures, or original art. Look for products that are photo-safe or acid-free. Chemical reactions can cause discoloration, yellowing, or brittleness in paper.
Simple, Ready-to-Use Hanging Methods
Below, we will discuss three methods of hanging pictures without damaging walls. These simple methods do not require any fancy tools. Visit any home improvement store, and you will find the things needed for these projects.
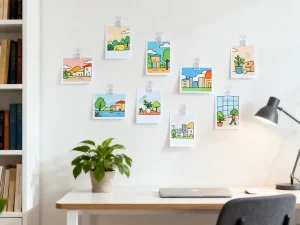
Mounting Strips and Hooks
The easiest and most intuitive approach to mounting photographs is to use peel-and-stick mounting strips and hooks. It is one of the best methods for hanging photos on brick walls.
There are two main components of a mounting strip: an adhesive strip and a matching strip. The former bonds to the wall while the latter bonds to the art. And when you press the strips together, they form a strong bond. If you want, you can easily remove the art by separating the interlocking mechanism.
Here is a step-by-step guide to using mounting strips and hooks:
- To remove dirt or grease from the wall, clean it. You can use rubbing alcohol for this purpose. Then allow the surface to dry completely.
- Peel one side of the adhesive strip and press it back onto the frame.
- Attach it to the wall by peeling the remaining backing off.
- Remove the frame from the wall but leave the strip in place. Leave it for about an hour to allow the adhesive to bond with the wall.
- Go back after an hour, and the firms repress the frame onto the wall.
With this method, you can hang lightweight to medium-weight canvases, pictures, cardboards, and decorations. Mounting strips often come with various weight ratings. Read the packing carefully.
To make your art look even cleaner and sturdier, you can first mount your photo or poster onto a foam board or thin plywood using spray adhesive. This way, the piece won’t curl or warp over time, and the strips will grip more securely to the flat backing.
Mounting Putty and Dots
If you are wondering how to hang photos without frames, mounting putty and dots can be the answer. They are versatile and easy to use. Mounting putty is a moldable adhesive that comes in small, square-shaped pieces. Adhesive dots are double-sided, pre-cut circles of adhesive that bond pretty well to smooth surfaces.
Mounting putty is very easy to use. Pull a small pinch or dot off a piece of putty and roll it into a ball. Press the piece to the back corners of your item. Then press the item firmly against the wall. Depending on the weight and size of the item, you may need to use multiple pieces of mounting putty.
This method works well for hanging unframed posters, photos, and children’s art. Mounting putty is easy to remove and works well for temporary displays. However, avoid using mounting putty if you want to hang heavy pictures without nails.
Pro tip: If the item is lightweight, such as artwork or a poster, you can mount it on a piece of thin cardboard or foam board using glue for hanging pictures. This will help keep the paper flat. Once you have mounted the board, you can easily attach it to the wall with adhesive dots or putty.
Mounting Tape
For those wondering how to hang picture frames without nails, mounting tape can be convenient. Double-sided mounting tape is basically foam tape with adhesive on both sides. It is used to hang relatively heavy items on the wall. In fact, up to 100 pounds!
Using this tape is pretty straightforward. Just cut the desired length and press it firmly onto the back of your photo or art. Then peel off the remaining backing and firmly press the item against the wall.
This method is good for hanging items that are heavy and awkwardly shaped, such as oversized frames and mirrors. Mounting tape is a useful thing if you want to avoid drilling into the brick.
Using Spray Adhesive to Hang Pictures without Drilling Into the Wall
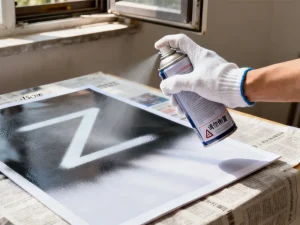
One creative way to display posters and photos is to mount them onto a rigid board. And using spray adhesive is the best way to attach photos to a wooden board. It gives the item a clean, professional, and frameless appearance.
Here is the list of materials you will need for this project:
- Your photo, poster, or print
- A flat, sturdy board frame for pictures. It can be a piece of thin plywood or a foam board
- Spray glue for photographs
- A utility knife
- A straight edge
- Fine-grit sandpaper
- Command strips
- Paint and a brush
The Step-by-Step Process
Step 1: Find a clean and well-ventilated area. To protect the work surface, consider laying down some cardboard or newspaper. Remove any dust or debris from the board. To visualize the final position, place the photo or print on the board.
Step 2: Shake the can of spray adhesive and apply an even and light coat. Hold the can about 8 inches to a foot away from the board. Apply in a sweeping motion, and gradually move toward the edges. Avoid overspray.
Step 3: Lay the print or photo onto the board. If you are using an oversized board, do not worry about perfect alignment. Use a soft roller or just your hands to smooth the print down. If there are air bubbles, push them toward the edges. To ensure a secure bond, press the print evenly across the entire surface.
Step 4: Now use a utility knife to trim the edges of the print. It will look neat and professional. To make it neat, place a straight edge along the edge of the print. Do this on all four sides.
Step 5: If the board contains fluffy or rough bits of wood or paper, lightly sand the edges. This will make the board look clean and smooth. To match the color of the wall or the photo, consider painting the exposed edges of the board. Black is a good color for a black-and-which photo.
Step 6: Hang the Piece. You can use command strips the way we discussed in the previous section. Later, if you want, you can easily remove or reposition the photo.
Wrapping Up
You can personalize a space by hanging pictures without damaging the walls. There is a genius way to hang any kind of frame on the wall. Depending on the nature of your project, you can use either peel-and-stick hooks or give it an even more personal touch by using spray adhesive.
It is up to you what kind of vibe you want to add to your living space. It all comes down to being specific about what you want to do and choosing the right tools and materials. We hope you have now found the best way to hang pictures without nails. Go ahead. Unpack the framed photos and start decorating.