
If the sewing machine thread keeps breaking, sewing becomes frustrating. You sew a few stitches, the thread snaps, and you start over. Then it happens again.
It’s normal to ask: Why does my thread keep breaking?
The truth is that most thread-breaking issues come from a few causes. The thread is being pulled too hard, rubbed too much, or caught on something sharp. Just address the particular cause, and your stitches will go back to normal.
The goal of this article is to shed light on the reasons for thread breakage. Just determine the reason, and we will assist you in resolving the issue. I will mostly follow the “check the basics first” approach. Hopefully, you will find answers to some of your most nagging questions here.
The Fastest Clue: Where Is It Breaking?
Before you adjust anything, look at where the thread snaps. If the top thread keeps breaking near the needle, there can be a range of reasons: top threading, needle damage, tension, or just a rough spot along the top path.
If there are tangles right before the thread snaps, the top thread is probably not seated in the tension system. Another possible reason is that the bobbin area is dirty.
Friction and heat can cause it to break only at high speed (often in embroidery). The key is to fix the issue so you can save your valuable time.
Now let’s see all the possible issues and find solutions.
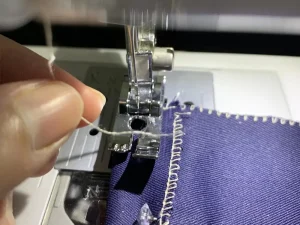
1. The Machine is Threaded Incorrectly
When you notice that the thread keeps breaking on the sewing machine right away, the reason is that the top thread is threaded incorrectly. Even if it is threaded in the right path, it is not seated.
Many people tend to make the mistake of threading with the pressure foot down. With some machines, when the foot is down, the tension discs are closed. As a result, the thread fails to slip between them. The tension is unstable, causing immediate snapping.
Fix
Make sure the pressure foot is raised first. Then, raise your needle to the highest point. Pull the thread out completely and rethread from the spool. The thread must pass through the take-up lever. Miss that lever, and you will likely have the sewing machine thread breaking issue.
2. Tension Is Too Tight
When there is too much tension, it pulls the thread through the stitch cycle. Too much top tension can stretch and snap the thread. This is one of the main reasons a sewing machine keeps breaking the top thread.
You may notice the problem after switching thread type, changing fabric, or sewing over thicker layers. The problem can also arise after you have cleaned your machine and bumped the dial.
Fix
If you are stuck thinking, “Why does my sewing machine thread keep breaking, check the tension. This is often the quickest fix.
Here’s how to adjust the thread tension on a sewing machine. Just set the top tension back to a normal setting. A mid-range number is safe with most machines. Then use the same number of layers to test on scrap fabric.
If the issue persists, try reducing the top tension one step at a time. Do not go from one extreme to the other.
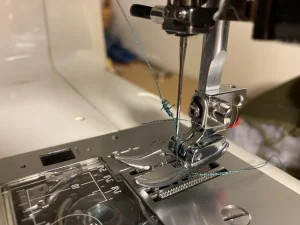
3. The Needle is Faulty, Or Not Inserted Fully
Needles are inexpensive, but they play a critical role. If a needle gets dull, it quickly heats up and then frays the thread. A bent needle rubs the thread as it passes through the eye. Use a needle that is too small, and the thread will pinch it with every stitch. And all these can lead to the issue of breaking the thread.
Needle issues prompt questions like “why does my needle keep breaking on my sewing machine?” or “why does my sewing machine needle keep breaking?” When you use the wrong type of needle, or if it is not seated correctly. It can also happen when the fabric is being pulled, and the needle hits the plate.
Fix
The obvious solution to this issue is to put in a new needle. It should be inserted all the way up into the clamp. And tighten it firmly. Make sure you are using the correct needle type for the fabric. Use denim for jeans, stretch for knits, and sharp for woven cotton.
The needle size must be appropriate for the thread. If you are using a thicker thread for a sewing machine, your needle should have a larger eye.
If your sewing machine’s top thread keeps breaking and there is a fuzzy thread above the needle, the first thing to do is to change the needle.
4. Your Thread is Old, Weak, or Low Quality
When the thread cannot withstand the pull and friction of the stitch, it breaks. The old thread is brittle. If the thread is cheap, it can have thin spots. Special settings are required for some decorating threads.
So, if you have tried the basics but are still facing thread breaking, test the thread itself.
Fix
Use high-quality, all-purpose polyester thread. If it resolves the issue, you can be sure that the cause was the old thread. When everything else looks good, this simple act can answer “why does my thread keep breaking in the sewing machine?
5. The Spool is Not Releasing Thread Evenly
Even when the machine and the thread are fine, the spool feed may not be. The thread may snag on the spool notch. Maybe the spool cap is too tight. Or you might mount the spool in the wrong direction in the machine. In such cases, instead of gliding, the thread jerks. This jerking can even snap the thread.
Fix
As you sew slowly, keep an eye on the spool. If the spool sticks or jumps, fix the feed. Ensure that the notch on the spool is not grabbing the thread as it feeds. Use an appropriate spool cap. Cross-wound spools and stacked spools must be mounted in the way your manual recommends.
6. Lint Buildup or Broken Thread in the Bobbin Area
Lint can build up faster than you might expect. It can create extra friction, leading to inconsistent tension. Bits of broken thread can wrap around the hook. And it can act like a brake.
Fix
Open the bobbin area and clean it. Use a small brush to remove lint. If there are loose threads, remove them. You can oil your machine only if the manual recommends it. Do not use too much oil because it can attract more lint. Lint and drag are worth checking if the thread keeps breaking in the sewing machine.
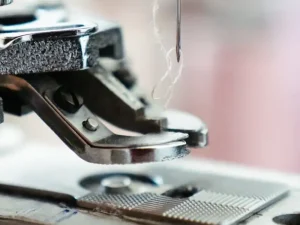
7. A Burr, Nick, or Sharp Edge is Cutting the Thread
Even after you’ve rethreaded the machine, swapped the needle, used better thread, and cleaned out the lint, your thread might still be breaking.
Take a careful look along the thread path. Sometimes a tiny sharp edge or rough spot is the culprit. Common places to check include the needle plate hole, the bobbin case edge, and the hook area.
Fix
To fix this issue, first, turn your machine off. If the manual allows it, remove the needle plate. Gently feel with your fingernail along the thread path and around the needle hole. If you feel it, the thread will catch.
In some cases, you can gently smooth the burrs. But if you are unsure, take the machine to a repair shop. They can quickly replace a damaged plate or case.
8. Bobbin Problems: Wound Wrong, Inserted Wrong, or Wrong Type
An unevenly wound bobbing can pull in jerks. An improperly sized bobbin can create friction inside the bobbin case. In either case, it can change tension and cause snapping. You may even notice that the top thread keeps breaking, because it is fighting extra resistance underneath.
Fix
Rewind the bobbin at a steady, medium pace. The thread should lie evenly. Also, make sure the bobbin size is compatible with your model. Insert the bobbin in the correct direction; clockwise or counterclockwise matters.
9. Spray Adhesives: Helpful for Holding Layers, Risky If Overspray Hits the Machine
Spray adhesives are widely used in sewing and embroidery. They prevent fabric layers from shifting by holding them in place. And less shifting of the fabric can actually reduce thread breaking.
However, overspray is a real issue. If adhesive mists come in contact with the tension discs, guides, or the needle area, the thread path can get sticky. This can increase drag and tension, resulting in the thread breaking. For a deeper look at how spray adhesives are used in sewing and embroidery, and how to apply them correctly, see our guide on temporary spray adhesives for sewing and embroidery.
Fix
When spraying the adhesive, maintain some distance between the canister and the machine. Before you stitch, allow the adhesive some time to get tacky. If you use spray adhesive near the stitch zone, adhesive residue can build up on the needle. As a result, you may need to change needles more often.
Final Recap
If you are still asking, “Why does my thread keep breaking, remember this: thread snaps because something is pulling too hard, rubbing too much, or catching on a rough edge.
In most cases, the fixes are simple. Rethread with the presser foot up. Replace the needle. Use a different thread. Adjust tension in small steps. Clean it. Make sure the spool feeds smoothly. And apply spray adhesive in a way that it does not gum up your machine.
Address these common issues, and you will be back to sewing without constant interruptions.