
Today, embroidered patches have become the best way to decorate any item and make it unique. For personal use, people prefer embroidered patches to decorate their items, such as clothes, bags, and hats. Interestingly, brands are now also using embroidered patches for logos and brand identification. However, when it comes to attaching them, beginners often ask: How to attach embroidered patches?
Actually, an embroidered patch is a small piece of fabric with designs stitched onto it. These designs can be anything, such as a logo, a name, or simply artwork. But if you are new to these patches, attaching them might feel difficult. However, you need not worry! In this guide, I will help you attach the patch step by step using adhesive spray. So, let’s get started.
Factors You Must Consider Before Attaching a Patch Using Adhesive Spray

Attaching a patch might sound simple at first. However, a slight mistake can ruin the entire item or even cause it to be damaged. So before you get started, here are a few things you must consider.
- Check Fabric & Its Compatibility: You might have heard that not all fabrics work equally well with adhesive spray. For example, cotton and denim fabrics might hold the glue well due to their hard nature. However, silk and smooth fibers might not hold the spray adhesive. So, before starting anything, make sure the fabric you are using is compatible with the spray.
- Choose Size & Weight of the Patch: The size and weight of your patch also matter. Know that if you use a patch that’s too large, it may not stay in place for long with spray alone. So always keep the size of your patch small.
- Proper Placement & Positioning of Patch: Before spraying, decide exactly where you want to place the patch. Remember, once the spray is applied in the wrong place, it will be difficult to remove. So, always check the alignment and position of the patch before applying the spray.
- The Right Type of Adhesive Spray: There are different adhesive sprays with varying strengths. Some sprays are even permanent. Always read the label and choose the right type for your needs.
How to Attach Embroidered Patches Using Spray Adhesive: Step-by-Step Guide
As I said above, embroidered patches are small fabric pieces with threaded designs. However, these patches come with different backing types. Each of those requires a different attachment method. But here, I will discuss the most common way to attach an embroidered patch using fabric spray adhesive. These are the steps you must follow.
Step 1: Get Your Workspace Ready
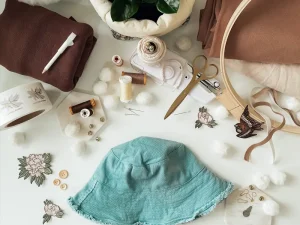
First of all, before doing anything, you have to make your workplace. You should know that a messy workplace also makes your entire work messy and causes hurdles. Therefore, to make it organized, initially pay heed to the working surface. For this, choose a flat, stable surface, such as a table or desk. This smooth surface will help you attach the patch evenly without worrying about wrinkles.
After that, protect your working area. Actually, adhesive sprays are very sticky; they can quickly spread and stick to your table or extra fabric. Hence, I recommend placing some newspaper, cardboard, or an old cloth under your fabric. These things will catch any extra spray and keep your area clean.
Step 2: Clean Your Fabric Thoroughly
Now, after organizing and cleaning your working area, come to the fabric’s cleanliness. Know that if there is any dirt, dust, oil, or moisture on your fabric, the spray will not stick properly. This improper stickiness will cause delays and hassles. Sometimes, when you look at the fabric from the outside, it appears clean, but it still has hidden dust particles. These particles will hinder the bond later. Hence, always wash your fabric with a mild detergent and let it dry completely. Why?
Because a damp fabric will not allow the adhesive spray to adhere firmly. If you use such a damp fabric, the patch will peel off shortly. So always let it dry. Now that you have cleaned the fabric, make sure it is smooth and wrinkle-free. You might notice that after washing, wrinkles usually occur. Right? These wrinkles can cause uneven patch attachment. Thus, iron the fabric slightly, but not too much. This smooth surface will ensure proper stocking of adhesive spray.
Step 3: Place the Patch in the Right Spot
Now that your fabric is clean, wrinkle-free, and ready. Right? The next step is to position your embroidered patch correctly on that fabric. Suppose you place the patch randomly on the fabric. What will be the results? Definitely, it will be difficult to reposition it once you apply the spray. Thus, at this stage, you have to be careful. Simply place your embroidered patch gently on the fabric without using any spray.
Remember, this is not the final spot. At this point, move the patch around at different angles. The point will come when you find the spot on the fabric where the patch will sit and look perfect. Now, check from every angle to make sure it looks straight and not tilted. When you know everything is aligned, mark that spot with chalk. This mark will guide you when you attach the patch later.
Step 4: Apply Spray Adhesive & Give It Time
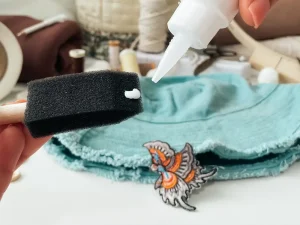
Are you fully satisfied with the patch placement now? It’s time for the most critical step. You have to apply the embroidered spray adhesive. However, before applying it, shake the can well. The reason is that adhesive sprays are generally suspensions. So shaking mixes the glue properly. But at this point, many of us make mistakes. What? Actually, we often spray the fabric directly from above. But this is the wrong method.
For proper spray, hold the can at a small distance (about 6–8 inches) from the surface. Here, you have two options. You can apply the adhesive spray directly on the fabric or on the back of the patch. Are you a beginner? If so, I suggest applying the spray to the back of the patch, as it is a cleaner, easier way.
However, apply a very thin layer of the spray first. Too much spray will cause a mess and will spread everywhere. However, later you can apply more spray if needed. Once you have applied the spray either to the fabric or the patch, do not attach the patch immediately. Wait for a few seconds until the adhesive becomes slightly tacky (a little sticky).
Step 5: Stick the Patch in Place and Let It Sit
After you wait and the adhesive becomes slightly tacky, the final step is very exciting. It is finally time to attach the patch in its place. Now, carefully place the embroidered patch onto your fabric. Try your best to match it with the position you marked earlier. However, at this point, don’t rush the process. Instead, place the patch slowly because moving it too much at this stage can spread the glue.
Now that you have placed the patch, press it firmly with your hands. Apply hand pressure, especially on the edges. Why? Because it often becomes loose. At this stage, also make sure there are no air bubbles or wrinkles under the patch. If present, immediately remove them by pressing, as later they will weaken the bond.
Now, when the patch has finally reached its spot, let it set properly. Do not touch or move it for a few minutes. For the best results and a strong bond, leave it undisturbed for a few hours. After the adhesive spray has settled and bonded, your patch is finally attached to the fabric.
Tips for Best Patch Application Using Spray Adhesives
Now, from the given steps, you might realize that attaching the embroidered patch with adhesive spray is the easiest way. But still, if you want better results, a few tips can help you a lot. For the best patch application, consider a few tips.
- Use Light & Even Spray: Adhesive sprayers are already sticky. Using too much spray does not increase its strength but can cause a mess. For better, more even sticking, always apply a thin, even layer. Also, hold the spray can about 6–8 inches from the patch and move it back and forth evenly.
- Test on a Small Area First: If you don’t want to rework the attachment of the patch, it is best to test on a small area first. This test will help you determine the appropriate amount of spray, the fabric’s nature, and the setting time. Now, when you work on actual fabric and a patch, the results will be mistake-free.
- Allow Proper Setting Time: After attaching the patch, do not touch or move it for at least 30 minutes. At this stage, the adhesive spray is still wet and can spread. So let it sit for several minutes or even a few hours for the adhesive to set completely.
- Combine with Sewing: Spray adhesive is usually strong and sticky. However, it is not always meant for permanent attachment. If you want a permanent patch attachment, first attach the patch with spray adhesive and then sew it around the edges.
- Avoid Excessive Washing: If you have attached the patch with only spray adhesive, don’t wash it frequently. Actually, adhesive sprays cannot hold well after repeated washing. To this end, always wash gently in cold water, use a mild detergent, and air-dry rather than use a dryer.
Frequently Asked Questions
Is spray adhesive permanent?
The permanence of spray adhesive depends on the type of spray you use. There are some temporary, semi-permanent, and permanent adhesive sprays. For a stronger, long-lasting hold, combine it with sewing.
How do I remove a sticky mess while using spray adhesive?
If you get a sticky mess from spray adhesive, use spray adhesive removers. These chemical-based removers are specially designed to quickly remove adhesive spots. However, before using them, always test on a hidden area first to avoid damaging the fabric or surface.
Can I use spray adhesive on all types of fabric?
No, you cannot use spray adhesive on any fabric. It usually works best on fabrics like cotton, denim, or canvas. However, it may not adhere well to delicate fabrics such as silk, satin, or very smooth polyester.
Conclusion
Embroidered patches have become the go-to choice for decorating a wide range of items. However, when it comes to attaching them, many get confused. The reason is that there are several ways to attach the patch to a fabric. Among those, using adhesive spray is the fastest, most reliable, and easiest way.
That’s why, in this guide, I have discussed, step by step, how you can attach embroidered patches with spray. Remember, each of these steps is equally important. Skipping one can affect the entire result. So take your time, plan, and follow these steps carefully for the best attachment of embroidered patches.