
Your HVAC system works hard to keep your home comfortable. But here is an interesting fact: if your ductwork is uninsulated or poorly insulated, it can waste up to 30% of the energy generated by your system.
Doesn’t it mean that your money is literally vanishing into the air?
Learning how to insulate ductwork properly is one of the most rewarding home improvement investments. And this is not something that requires a high level of technical knowledge. With the right materials and guidance, any homeowner can take it as a DIY project.
This comprehensive guide will teach you everything you need to know about insulating ductwork. Here you will learn everything from material selection to the techniques used by professionals.
Let’s dive in
Is It Worth Insulating Ducts?

When heated or cooled air blows through uninsulated ducts in an unconditioned space, significant heat transfer occurs. In summer, your cold air absorbs heat from the surrounding environment. In winter, warm air loses heat in unconditioned attics or basements.
As a result, your HVAC system has to work harder to maintain your desired temperature.
But that’s not all. When cold air blows through ducts in a humid area, moisture can form on the exterior surfaces of the ducts. It can also cause mold growth, corrosion, and even structural damage. Duct insulation can prevent this condensation, helping extend the lifespan of your HVAC system.
Materials Needed
For a DIY-friendly duct insulation project, you need one of the following:
- Foil-faced fiberglass duct wrap: This is a common choice for existing metal ducts.
- Rigid foam board: It works well for rectangular runs and on flat-sided trunks.
- Reflective wrap insulation: If radiant heat is an issue, reflective/ bubble wrap insulation is helpful.
Also, you need some sealing products. The way you seal and bond overlaps, seams, and terminations largely determines insulation performance.
- Mastic: This brush-on duct sealant is used for duct joints before insulation.
- UL-rated foil tape: Use it to seal the insulation facing and finishing seams.
- Insulation adhesive: The Adhesive will prevent sagging. It will also keep the edges bonded, especially on corners and undersides.
- Straps/hangers/ties: To prevent the insulation from drooping over time.
In addition to the materials mentioned above, you also need some safety tools for this DIY project. When cutting fiberglass, use eye protection, gloves, and a dust mask. If you work in attics, ensure a stable footing. In crawl spaces, particularly if the area is damp or dirty, wear a headlamp and a disposable suit. If needed, consider wearing knee pads.
How to Insulate Ductwork (A Step-by-Step Guide)
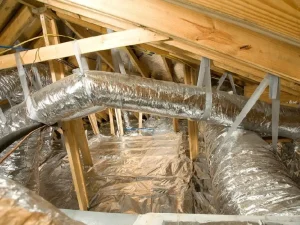
Below is a step-by-step guide for insulating ductwork. Here, I am considering all possible scenarios. Use it as a general guideline and follow the steps that apply to your specific project.
Step 1: Seal the Ductwork
Seal the air leaks before you wrap anything. Look for any air leaks in the long seams on trunks. Check the elbows, takeoffs, and transitions. Check the connections at boots and plenums, and check any gaps around fittings and collars.
Brush-on mastic is often recommended for metal-to-metal joints. That’s because it seals irregular gaps and stays pretty flexible. Mastic is usually the best primary air seal. You can consider using foil for sealing small gaps.
Allow time to cure the sealant. To determine the specific curing time, check the manufacturer’s user guide. Sealing is important because it improves delivery to rooms even before insulation is applied.
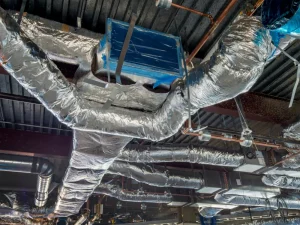
Step 2: Choose an R-Value That Matches the Space
R-6 is often the best choice for crawl spaces, basements, and unconditioned areas. Choose R-8 for harsh attics, particularly if the region has extreme temperature fluctuations.
Also, remember two things. First, never crush the insulation with straps. Compressed insulation loses performance. Second, make sure the vapor barrier is continuous. Moisture can enter through gaps and ruin effectiveness.
Step 3: How to Wrap Ductwork with Insulation (Foil-Faced Fiberglass Wrap)
For most homes, this is the standard method. It is essentially the core of how to insulate HVAC ductwork.
1. Measure and cut
Measure each section of the duct, and cut the wrap accordingly. At the seams, leave a couple of inches for overlap. To make sure the edges are clean, cut from the fiberglass side.
2. Place the facing on the outside.
Wrap in a way that the foil faces outward. This is your vapor barrier. It improves cooling performance and prevents condensation.
3. Wrap snugly
Try to establish full contact with the surface of the duct, but do not squeeze the insulation flat.
4. Prevent sagging
Every 12-18 inches on the horizontal runs, use straps/ties. In most situations, wire ties can be a better choice. Ensure that the insulation is tight on the duct.
5. Use adhesives
Many DIY enthusiasts make the mistake of skipping this part. The insulation can belly-sag or peel on the underside of a duct run, at irregular fittings, and at sharp corners. An insulation adhesive can increase the long-term durability of the insulation by holding the wrap in place and keeping the seams aligned.
6. Seal the seams
The foil facing should overlap at least 2 inches. Use UL-rated foil tape to seal the overlap. Tape around the hangers and penetrations. To prevent humid air from entering the insulation layer, seal the ends of each wrap. The facing should be sealed so that your insulation does not become a sponge for humid air.
How to Insulate Metal Ductwork (Round and Rectangular)
Sheet metal trunks with branch lines are generally used in most homes. The approach for insulating metal ductwork is more or less the same:
- First, use mastic to seal duct seams.
- Wrap it with foil-faced duct tape.
- Apply adhesive and add mechanical supports where needed.
- Tape all facing seams.
This is how to insulate rectangular ductwork. The method is the same for a round one. With metal ducts, the most common problems are sharp edges and condensation. Slow down around cleats, screws, and takeoffs. If there are small, facing cuts, tape them immediately.
If you are wondering how to insulate metal ductwork, the method is the same. Check the local code. Depending on your location, you may be required to use a specific facing or thermal barrier in exposed areas.
How to Insulate Ductwork in the Attic
Attics are very hot in summer and very cold in winter. That’s why insulating ductwork in attic runs can be hugely rewarding. When insulating ductwork in attic runs, pay attention to the following three things:
First, use enough insulation. R-8 is often the best choice. Second, do not compress insulation under straps. And third, make sure the vapor barrier is completely sealed. Sealing at least the cold supply ducts is crucial. In general, this is how to insulate attic ductwork. However, the steps required for your specific project may vary a bit.
How to Insulate Ductwork in a Basement
Basements offer easy access, so you can achieve a clean sealing and wrapping pretty easily.
Before you dive in, check if the basement is conditioned. If it is fairly air-sealed and heated/cooled, you will gain little from insulation. But insulating the ductwork can be very useful if the basement is unheated, drafty, or partially air-conditioned.
In humid summers, cold supply ducts can sweat even if the basement is air-conditioned. So, you can benefit from insulation with a sealed vapor barrier.
The exact procedure of insulating the ductwork is the same as described in the previous section. Just check the general guideline, dive into action, and as you go, you will figure out how to insulate basement ductwork.
How to Insulate Ductwork in a Crawl Space
Crawl spaces are usually humid and infested with pests. These spaces are not easily accessible. That’s why proper preparation is the key. If you are planning to insulate ductwork in a crawl space, you can approach your project in the following order:
- Reduce ground moisture by installing a ground vapor barrier.
- Before you start insulating, seal all duct joints with mastic.
- Make sure nothing sags or touches the ground. Strap ducts and insulation.
- Prevent humid crawl air from entering the insulation by taping and sealing the facing.
This is how to insulate crawl space ductwork. Remember that, in crawl spaces, seams and edges are more likely to get pulled or bumped. To prevent peel-back, use a good insulation adhesive at tricky corners, and especially at starting edges.
How to Install Bubble Wrap Insulation on Ductwork
Reflective bubble insulation is used where radiant heat is a major problem. This insulation is light and pretty easy to handle.
To install this insulation, first clean the surface so the tape and adhesive can bond together. Wrap in a way that the reflective side faces outward.
Seams should overlap by a couple of inches. Then use foil tape to seal the overlaps entirely. Identify the starting edges and undersides where gravity can pull and loosen them. Apply adhesives at those points, and then strap as needed.
If you are wondering how to insulate hvac heating and cooling ductwork, the process is more or less the same. Stop leaks, add enough R-value, and maintain a continuous vapor barrier.
How to Install Insulated Ductwork
Replacing your damaged or badly routed runs is often the smartest move. That means, if insulation is integral for your ductwork, you can consider using pre-insulated duct products.
But remember that, even with insulated ductwork, the connections remain the structural weak points. Even if the R-value of your material is high, the system’s efficiency depends on the tightness of the seal. So, make sure to address the junctions at boots, plenums, and takeoffs.
Also, note that in a pre-installed ductwork, the exterior jacket serves as a vital vapor barrier. If this jacket is left open at the ends or if it is punctured, moist air can infiltrate the insulation, leading to condensation and hidden mold growth.
Final Takeaway
Insulating your ductwork is less about complicated techniques and more about doing the fundamentals well. Seal first and then insulate. Treat the outer facing like a vapor-tight jacket. To make sure your ducts deliver comfort with less energy, use solid insulation and the right tapes, mastics, and insulation adhesives.
We hope that, whether you have a metal trunk, rectangular or flex duct type, and whether it runs in an attic, crawl space, or basement, you are now prepared to take action.