
Almost every day, you look at large, strong, yet lightweight products. Have you ever wondered how they are made so smoothly and perfectly? The answer lies in a simple, modern manufacturing process called vacuum infusion. However, for many beginners, this term might sound technical, so they ask: What is the vacuum infusion process, and how does it work?
Knowing its basics is very crucial, especially if you are handling resins and fibers. This process makes their combination much more controlled, efficient, and high-quality. But if you are new to vacuum infusion and can’t understand it, worry not! In this guide, I will explain everything about it from its basics to types, uses, and benefits. So let’s get started.
What Is the Vacuum Infusion Process?

First, let’s understand what vacuum infusion is.
The vacuum infusion process is a method for producing strong, lightweight composite products. In this process, dry fiber materials, such as fiberglass or carbon fiber, are placed in a mold. After that, a vacuum is applied to pull liquid resin into them. The vacuum ensures that the resin spreads evenly through all layers without trapping air.
Once cured, you get a high-quality, more durable composite product. Actually, carbon fiber has become incredibly popular for making a range of important products. However, it doesn’t work alone. Instead, you have to add resins to make the final products. Usually, you have seen that the resin is applied manually, which might not be spread evenly.
As a result, the chances of defective products increase. However, in vacuum infusion, there is no need to apply resin manually. It uses vacuum pressure to draw resin through the material naturally. Now, because of this controlled flow, the final product has fewer defects, such as air bubbles. It also uses the right amount of resin, reducing waste and improving strength.
Main Components Used in Vacuum Infusion
Now you understand the basics of vacuum infusion. Right? But before you start this process, you also must know which components you will need. Remember, if any of these components are missing, the entire process will be ruined.
- Mold: The base shape from which the product is created. It defines the final size and design of your composite part. Before infusion begins, you have to place the dry material into the mold.
- Reinforcement Fibers: These are the dry materials that give strength to the final product. Common examples include fiberglass, carbon fiber, and sometimes Kevlar.
- Resin: The liquid material that hardens after curing. It flows into the fibers during the infusion process and locks everything in place. Once it sets, it turns the soft fiber layers into a strong, solid structure.
- Vacuum Bag: The vacuum bag is a special plastic sheet used to cover the entire setup. Its primary job is to create an airtight environment.
- Vacuum Pump: The machine that creates suction. It removes all the air from inside the vacuum bag, creating the pressure difference needed for resin flow.
- Flow Media: It is a layer placed on top of the fibers. It helps the resin spread more quickly and evenly, acting as a pathway that guides it.
- Peel Ply: Now there is also a peel ply; it is a thin layer of fabric placed over the fibers. It prevents the resin from sticking directly to the flow media.
- Resin Trap: Lastly, the resin trap is placed between the vacuum bag and the pump. Its job is to catch any extra resin before it reaches the pump.
How the Vacuum Infusion Process Works: Step-by-Step Guide
Once you know the component involved in the vacuum infusion, you can proceed to the actual process. At first, it might feel like a very complicated process. However, when you understand it properly, it will be much easier to perform. So let’s dive in and explain the vacuum infusion step by step.
Step 1: Prepare the Mold
The first, most important step in the process is cleaning the mold. As I said above, this is the template that will shape your final product. So it must be cleaned and prepared first. If any dust particles, oil, grease, or leftover debris remain, the product may be defective. It is best to wash the mold with a mild cleaning agent and let it dry.
Once it is dried and no dust remains, apply a release agent. These are special chemicals that prevent the composite material from sticking to the mold surface after curing. If you forget to apply the release agent, it will be very difficult to remove the final product. So, evenly apply a thin layer of these agents to the mold, or follow the manufacturer’s instructions.
Step 2: Place Dry Fiber
Once your mold is ready, the second step is placing the dry fiber material inside it. In composite materials, you use fiberglass, carbon fiber, or other reinforcement fabrics. Remember, these fibers will make the main structure of the final product. Therefore, you have to place them correctly and carefully. For this placement, vacuum infusion spray adhesives are usually used.
Generally, these fibers are placed in the mold as layers. However, place them so there are no wrinkles, gaps, or overlaps. Also, lay them according to the shape of your mold. At this stage, you also need to add additional supporting layers, such as peel ply or flow media. These layers will improve resin flow and make the finishing process easier.
Step 3: Seal & Create a Vacuum
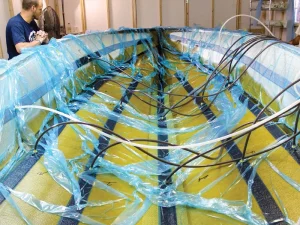
Are you sure that the dry fiber is placed inside the mold along with the peel ply, right? Next, you have to seal everything and create a vacuum. For this, use the vacuum bag and cover the entire setup to create an airtight seal. However, at this stage, seal all mold edges with sealing tape to prevent air from entering or escaping.
After sealing, connect a vacuum pump to the setup. Now this pump will start removing all the air from inside the bag. It is just like creating a strong suction effect. As the air is removed, you will notice that the vacuum pressure compresses the dry fibers tightly against the mold. This removes the trapped air even from the fiber layers. All this will help to flow the resin in the next stage.
Step 4: Infuse the Resin
After the vacuum is created inside the mold and there is no air left, it’s time to infuse the resin. At this stage, the dry fibers slowly turn into a solid structure. To introduce the resin into the mold, use tubes connected to the mold. When you add the resin to these tubes, there is already a vacuum pressure inside the mold.
This pressure automatically pulls the resin into the fiber layers, and you don’t have to do it manually. Now, the resin doesn’t stop there; it gradually flows evenly through the fiber layer under the vacuum effect. The flow media here guide the resin so it can reach every corner evenly. It ensures that no area is left dry or weak.
Step 5: Cure & Remove the Part
After the resin has fully spread through the fibers, the final step is curing. Curing means allowing the resin to harden and turn into a strong, solid material. During this curing time, you have to leave the entire setup undisturbed. Why? Because at this stage, the chemical reaction occurs inside the resin. These reactions allow for the formation of the final product.
However, this curing time varies from resin to resin and with the surrounding temperature. Generally, it takes a few hours. Once the resin is fully cured and hardened, turn off the vacuum and remove the bag carefully. Now, remove the final part, and the release agent will actually help there. This part is now ready for post-processing, such as finishing and trimming.
Some Common Types of Vacuum Infusion
When starting the vacuum infusion, keep in mind that it is not a single, fixed method. Over time, variations of this process have been developed, giving rise to different types. Those types of vacuum infusion suit different industries and applications. Before getting started, here are a few types of vacuum infusion you should know to choose the best one.
1- Standard Vacuum Infusion
This is the most straightforward form of vacuum infusion used everywhere. Here, the process is the same as I explained above. For example, the mold is cleaned, and a dry fiber layer is applied. After that, the vacuum pump is used to remove all the air. After that, the resin is pulled into the fibers using this vacuum pressure.
On curing, the final high-quality composite product is formed. In this type, the process is carefully controlled but still quite straightforward. There is no need for extra special requirements. So it is very cost-effective and beginner-friendly. It is commonly used to make boat parts, panels, and medium- to large-scale composite parts.
2- VARTM (Vacuum Assisted Resin Transfer Molding)
VARTM, which stands for Vacuum Assisted Resin Transfer Molding. It is an advanced version of the vacuum infusion process. Firstly, everything is the same as a standard vacuum process. For instance, dry fiber is placed in the mold, and resin is applied under vacuum pressure. But what makes it unique is the way resin is introduced and how it flows through larger or more complex parts. Let me explain it.
In the standard method, resin is placed at one end and the vacuum “pulls” it through the fibers. Right? But in VARTM, you first have to inject resin through the inlet tubes. Then the vacuum helps distribute it across a much larger area. This setup helps pull the resin through large fiber areas and complex mold sections. That’s why VARTM is considered ideal for producing complex, large composite parts.
3- SCRIMP Process
The SCRIMP process stands for Seemann Composites Resin Infusion Molding Process. SCRIMP is just a better and smarter version of vacuum infusion. It helps resin spread more evenly and quickly in large parts. How? In normal vacuum infusion, the resin spreads but may move slowly.
So there’s a chance the resin might dry in place during the manufacturing of large parts. But in SCRIMP, workers place special layers called flow media. These act like “roads” for resin. They help the resin travel in planned directions. As a result, it reaches all areas at almost the same time, including large, complex composite parts.
Advantages of Vacuum Infusion
Vacuum infusion has become a necessity for modern industries. Have you ever wondered why? The reason lies in the benefits that set it apart. So let’s discuss the top-notch advantages that vacuum infusion generally offers.
- Strong & Durable Final Products: First, vacuum infusion is known for producing very durable products. This is because, in this process, resin is spread evenly. There are no gaps left that lead to defects. As a result, the final product comes with no damage, which ensures its strength.
- Lightweight but High Strength: As I said above, vacuum infusion also helps in controlling how much resin is used. It means no extra resin is pulled, which can prevent resin buildup and reduce weight. This results in a perfect balance between strength and weight. The final product is strong yet lightweight.
- Better Quality & Smooth Finish: In addition to being defect-free, the final product is also smooth. During the vacuum infusion, air is fully removed. There are no bubbles, cracks, or other defects that affect the product’s quality. So it is very smooth and professional-looking, reducing the need for post-processing.
- Less Material Waste: Vacuum infusion is also more efficient in terms of material use. In traditional methods, extra resin is often wasted when applied unevenly. But in vacuum infusion, only the required amount of resin is used, not extra. It is pulled into the fibers in a very controlled way. So the chances of material change are highly reduced.
- Suitable for Large and Complex Parts: Making large, complex parts is often very difficult with old methods. But vacuum infusion proves handy in this case. It uses special flow media that acts as a path for resin flow. It means the resin does not dry in one way but is evenly spread throughout to make large products.
Where is Vacuum Infusion Used? Common Applications
Vacuum infusion is not limited to just theory. Instead, it has several practical uses in real life. Hence, to truly understand the value of vacuum infusion, let’s discuss which industries actually rely on this process.
1- Marine Industry
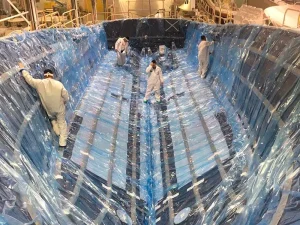
The marine industry is among the largest users of vacuum infusion. As you know, in this industry, strong but lightweight materials are of utmost importance. For example, boats need to move easily on water, so lightweight durability matters. This combination is attained through vacuum infusion. It produces boat parts, such as hulls and decks, with even resin distribution, making them strong, waterproof, and long-lasting.
2- Aerospace Industry
Now there is an aerospace industry where every kilogram matters. For aircraft parts, manufacturers need materials that offer high strength without adding weight. That’s where the vacuum infusion process comes into play. It is used to produce high-performance, precision-composite parts for aircraft interiors. It also ensures a high level of safety and reliability, which are critical in aviation.
3- Automotive Industry
In the automotive industry, vacuum infusion produces lightweight, strong parts. These parts are especially used in sports cars and racing vehicles. Reducing vehicle weight improves speed, fuel efficiency, and overall performance. In this process, parts such as body panels and structural components are produced.
4- Wind Energy
Vacuum infusion plays a very important role in the wind energy sector. How? This process basically helps make turbine blades. These blades are extremely large and need to be strong enough to handle heavy wind pressure. But at the same time, these blades also must be lightweight to handle height. So this is a vacuum infusion that evenly distributes resin across the entire blade. It ensures that the blades remain durable yet lightweight.
5- Construction
Lastly, the construction industry heavily relies on the infusion process. Here, this process helps in creating strong composite panels and structural components. These parts are used in buildings where durability and resistance to environmental conditions are critical. So vacuum infusion ensures that composite parts remain durable and lightweight.
Frequently Asked Questions
Is vacuum infusion better than hand lay-up?
Yes, in most cases, vacuum infusion is better than hand lay-up. It produces stronger, lighter, and higher-quality parts because the resin spreads more evenly. It is also cleaner and reduces material waste compared to hand lay-up.
What materials are used in vacuum infusion?
Vacuum infusion mainly uses dry fibers, resin, and basic supporting materials. The dry fibers (such as fiberglass or carbon fiber) provide strength to the final product. However, resin binds everything together, making it solid.
Can beginners learn vacuum infusion easily?
Yes, beginners can learn vacuum infusion, but it takes some practice. That’s why it is best to start by working with a professional. Once you know the basic steps and methods, you can perform it on your own.
Conclusion
Let’s conclude. Vacuum infusion is why modern industries are becoming more efficient. It is the process that produces durable, lightweight, high-quality composite products. In this process, you don’t have to rely on manual setup. Instead, it uses vacuum pressure that applies resin in the most controlled way. This even distribution is what makes the final product defect-free. That’s the reason vacuum infusion is widely used in the marine, aerospace, and automotive industries.